





How to Read a Before-and-After Photo

When we surveyed our customers this year, before-and-after photos came up as one of the most trusted things in beauty.
They also came up as one of the things people were most cautious about.
“Before and after photos, although it’s hard to know nowadays what’s been altered with AI.”
“I want before/after on real skin. Not perfect before and AI after.”
Fair enough.
Rather than asking you to simply trust what you see, we thought it would be more useful to share some of the things we look for ourselves.
And yes... you can use these on our photos too.
1. Look at the lighting first
Lighting can completely change the way skin appears in a photo.
Harsh overhead light can make texture, lines and shadows more noticeable, while soft frontal light can make the skin appear smoother and brighter.
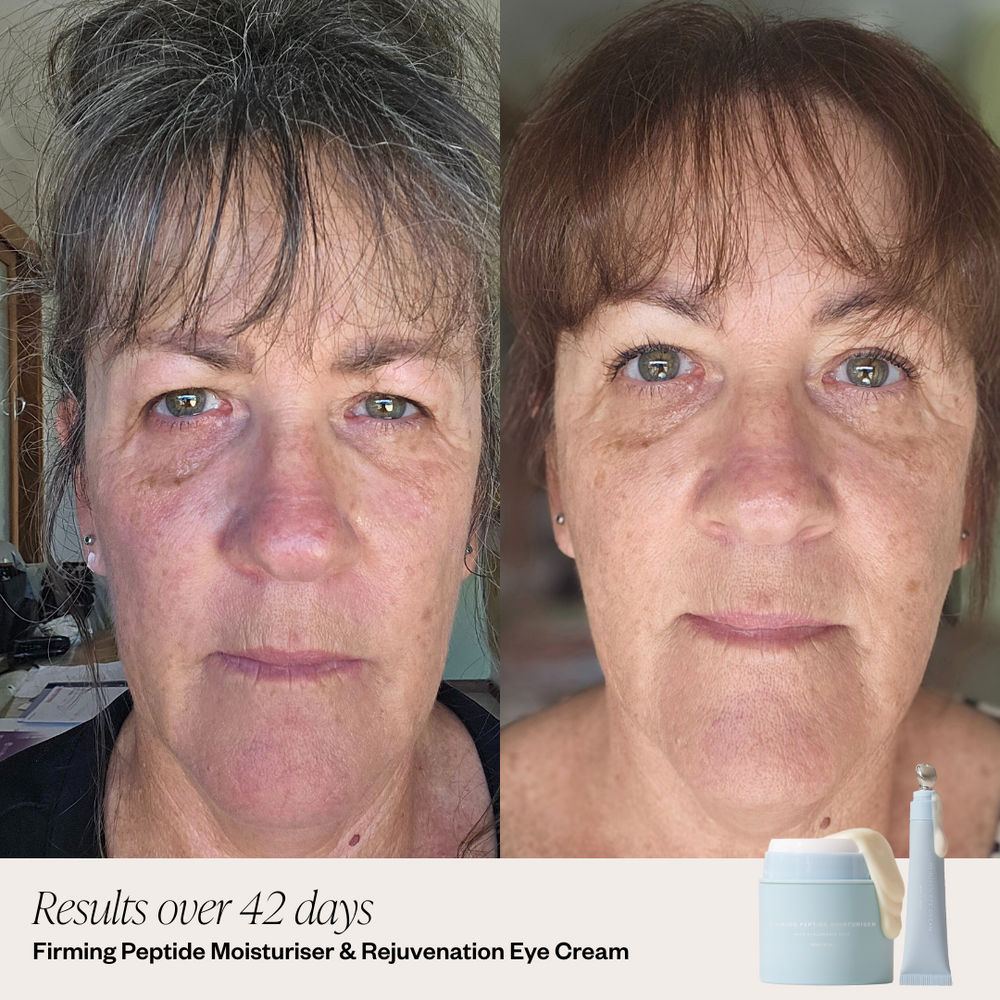
When comparing two images, look at the shadows under the eyes, nose and jaw. If the lighting has changed significantly, it may not be a fair comparison.
2. Check the background
Ideally, a before-and-after should be photographed in the same place, at a similar distance and under similar conditions.
If the background, lighting or environment is noticeably different, keep that in mind when looking at the result.
3. Check whether makeup has changed
A bare-faced before and a made-up after can make it much harder to judge what has actually changed.
Look at the brows, lashes, lips and complexion. Even a small amount of makeup can influence the overall appearance of the skin.
4. Look at the angle
Head position and camera angle can make a surprisingly big difference.
A slight change in chin position, posture or camera height can alter the way the jawline, eyes and facial contours appear.
For the clearest comparison, the positioning should be as consistent as possible.
5. Look at details that should stay the same
Freckles, moles, scars, hairlines and other natural features can be useful reference points.
If these suddenly look softened, moved or missing, it may be a sign the image has been edited.
Real skin should still look like real skin.
6. Look around the edges
Heavy digital reshaping can sometimes affect nearby straight lines or background details.
Things like door frames, tiles, mirrors or even clothing straps can occasionally look warped when an image has been altered.
It’s not always obvious but it’s worth noticing.
7. Real skin should still have texture
Pores, fine lines, freckles and texture are normal.
A genuine “after” photo doesn’t need to look completely poreless or flawless to show a great result.
In fact, we’d rather see real skin looking better than skin that no longer looks real.
8. Ask how long the result took
Timeframe matters.
A result after two weeks and a result after six months tell very different stories.
If a before-and-after doesn’t say how much time passed between the photos, that’s useful context to keep in mind.
9. Video can give even more context
Where possible, video can help show skin from different angles and in movement rather than relying on one still image.
One of our customers put it perfectly:
“Instead of before/after pics that often can be misleading, do it live / videos without being cut so customers can see the difference.”
We love this approach because it gives you more context and lets you see how the skin actually looks in real life.
What this means for us
We don’t want you to take any beauty result on faith... including ours.
We’d rather show real customers, real skin and as much context as possible so you can decide for yourself.
Before-and-after photos should help you understand what may be possible, not make you feel like real skin needs to look perfect.
Want to see more real customer results?
Explore our reviews and customer results, or chat with our team if you ever want more context around a particular result.
We’re always happy to explain what you’re looking at.